
わからんちん
前提
shopifyに触れたことのないど素人が開発環境構築から制作開始までを理解するための記事。
無料のアカウントを作る
練習とか勉強のためにお金を払うことは素晴らしい姿勢だけど、無料の手段もあるということを知っておく。
「パートナーアカウント」を使う
shoifyはお金がかかる。無料期間は3日間なので、無料の範囲ではろくなことができない。
無料でやっていけるのが「開発ストア」であり、そのための「パートナーアカウント」である。

ページ右上のリンクからアカウントを作れる。
パートナーアカウントはテーマの販売とかができるアカウントだもんで、住所やら何やらをきちんと入力する必要がある(修正は可能)。
開発ストアを作成する
アカウントを作るとshopify partnersの管理画面が表示される。ここからやっていく。
「ストア管理」から開発用のストアを作成する。
作成したストアは通常のshopifyと同じ扱いで、普通にshopifyの管理画面からいじれる。
要するに、タダでshopifyがいじれるようになった。
開発ストアはパートナーの管理画面からでも、通常のshopifyのログインからでもアクセスできる。
ローカル環境の構築
shopifyの開発は単純に言って超めんどい。
諸々を独自のコードで組み上げたものをインポートする感じになる。なのでローカルでは閲覧ができない。shopify上でないと確認ができない。
作る→アップして確認→修正→アップして確認…の流れになる。
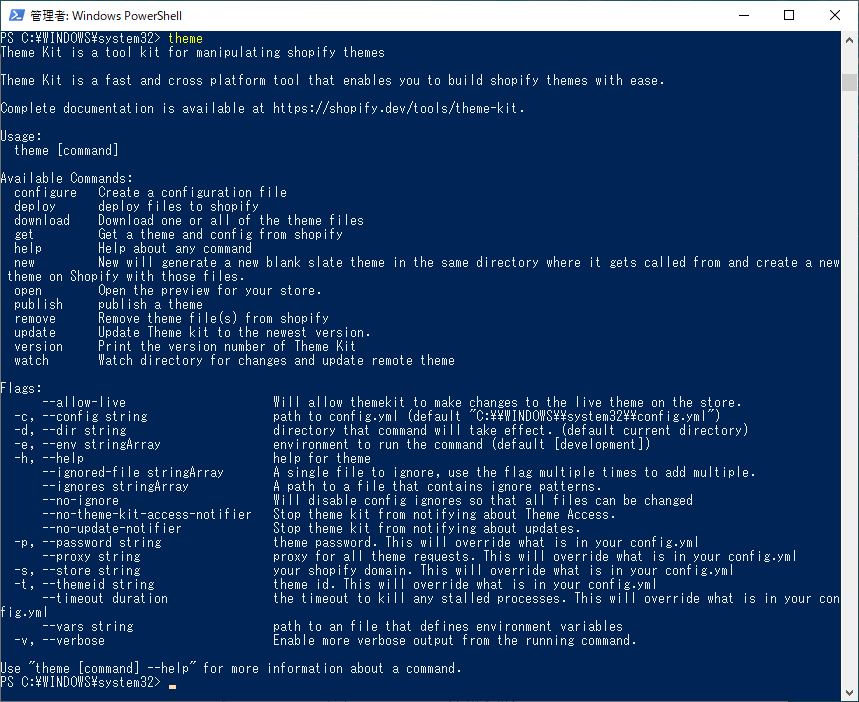
作成したテーマファイルはzipファイルでアップロードできるけど毎度作るのはだるいんでTheme Kitを使うのが一般的。API連携することでアプリケーション上からアップロードできる様になる。
で、その操作はGitとかそっち方面の、コマンドプロンプトで云々していくやつなんで、馴染みのない人にはかなりしんどい。
何はともあれマニュアルを読む。

chocolateyのインストール
現状、直接Theme Kitをインストールすることはできないっぽい。windowsは「chocolatey」からということなのでインストールする。
「Step 2: Choose Your Installation Method」の「Choose How to Install Chocolatey:」は「Individual」。つまり個人用。
Power Shellを管理者モードで起動して、ページ内にあるコマンドをコピペして実行。
こんな感じで完了した。
PS C:\WINDOWS\system32> Set-ExecutionPolicy Bypass -Scope Process -Force; [System.Net.ServicePointManager]::SecurityProtocol = [System.Net.ServicePointManager]::SecurityProtocol -bor 3072; iex ((New-Object System.Net.WebClient).DownloadString('https://community.chocolatey.org/install.ps1'))
Forcing web requests to allow TLS v1.2 (Required for requests to Chocolatey.org)
Getting latest version of the Chocolatey package for download.
Not using proxy.
Getting Chocolatey from https://community.chocolatey.org/api/v2/package/chocolatey/1.3.1.
Downloading https://community.chocolatey.org/api/v2/package/chocolatey/1.3.1 to C:\Users\***\AppData\Local\Temp\chocolatey\chocoInstall\chocolatey.zip
Not using proxy.
Extracting C:\Users\***\AppData\Local\Temp\chocolatey\chocoInstall\chocolatey.zip to C:\Users\***\AppData\Local\Temp\chocolatey\chocoInstall
Installing Chocolatey on the local machine
Creating ChocolateyInstall as an environment variable (targeting 'Machine')
  Setting ChocolateyInstall to 'C:\ProgramData\chocolatey'
WARNING: It's very likely you will need to close and reopen your shell
  before you can use choco.
Restricting write permissions to Administrators
We are setting up the Chocolatey package repository.
The packages themselves go to 'C:\ProgramData\chocolatey\lib'
  (i.e. C:\ProgramData\chocolatey\lib\yourPackageName).
A shim file for the command line goes to 'C:\ProgramData\chocolatey\bin'
  and points to an executable in 'C:\ProgramData\chocolatey\lib\yourPackageName'.

Creating Chocolatey folders if they do not already exist.

WARNING: You can safely ignore errors related to missing log files when
  upgrading from a version of Chocolatey less than 0.9.9.
  'Batch file could not be found' is also safe to ignore.
  'The system cannot find the file specified' - also safe.
chocolatey.nupkg file not installed in lib.
 Attempting to locate it from bootstrapper.
警告: Not setting tab completion: Profile file does not exist at
'C:\Users\***\Documents\WindowsPowerShell\Microsoft.PowerShell_profile.ps1'.
Chocolatey (choco.exe) is now ready.
You can call choco from anywhere, command line or powershell by typing choco.
Run choco /? for a list of functions.
You may need to shut down and restart powershell and/or consoles
 first prior to using choco.
Ensuring Chocolatey commands are on the path
Ensuring chocolatey.nupkg is in the lib folder
PS C:\WINDOWS\system32>
尚、アンインストールしたいときは「C:\ProgramData\chocolatey」をまるっと削除するだけ。
Theme Kitのインストール
こうなる。
PS C:\WINDOWS\system32> choco install themekit
Chocolatey v1.3.1
Installing the following packages:
themekit
By installing, you accept licenses for the packages.
Progress: Downloading themekit 1.3.1... 100%

themekit v1.3.1 [Approved]
themekit package files install completed. Performing other installation steps.
The package themekit wants to run 'chocolateyinstall.ps1'.
Note: If you don't run this script, the installation will fail.
Note: To confirm automatically next time, use '-y' or consider:
choco feature enable -n allowGlobalConfirmation
Do you want to run the script?([Y]es/[A]ll - yes to all/[N]o/[P]rint):y

Downloading themekit 64 bit
  from 'https://shopify-themekit.s3.amazonaws.com/v1.3.1/windows-amd64/theme.exe'
Progress: 100% - Completed download of C:\ProgramData\chocolatey\lib\themekit\tools\theme.exe (7.92 MB).
Download of theme.exe (7.92 MB) completed.
Hashes match.
C:\ProgramData\chocolatey\lib\themekit\tools\theme.exe
 ShimGen has successfully created a shim for theme.exe
 The install of themekit was successful.
  Software install location not explicitly set, it could be in package or
  default install location of installer.

Chocolatey installed 1/1 packages.
 See the log for details (C:\ProgramData\chocolatey\logs\chocolatey.log).
「theme」コマンドでヘルプが出るんで、インストールできてるかを確認できる。
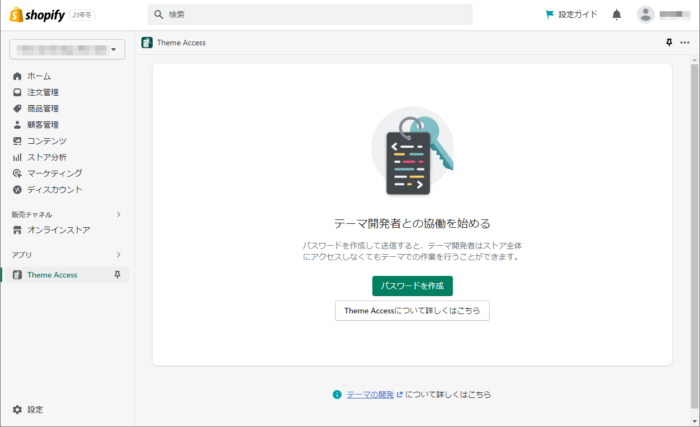
Theme kitとストアを連携
ストアにTheme Accessをインストールする。
インストールできるとこんな感じ。
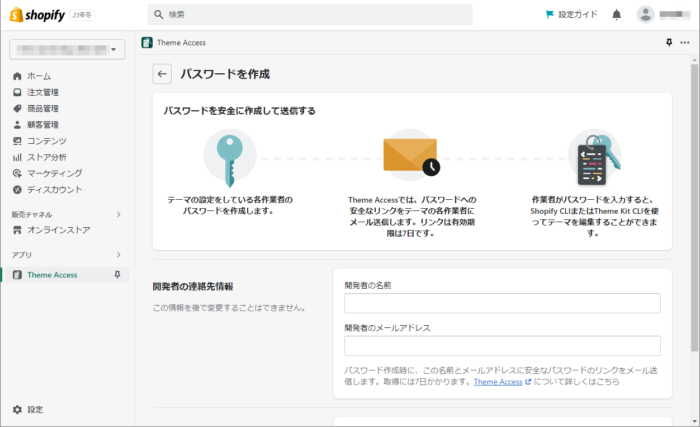
記入したメールアドレスにメールが届いて、それに書かれてるURLからパスワードを取得する感じになる。パスワードは再発行できるので、忘れても一応大丈夫。
ちゃんと使えるか確認するに、以下のコマンドが案内されてる。
theme get --list --password=[your-password] --store="[your-store.myshopify.com]"パスワード「1234567890」ドメイン「example.myshopify.com」だったら以下の感じになる。
theme get --list --password=1234567890 --store="example.myshopify.com"こんな感じで出力される。
PS C:\WINDOWS\system32> theme get --list --password=1234567890 --store="example.myshopify.com"
Available theme versions:
  [146152718649][live] Dawn
最初の数字群はテーマのIDになる。
こんな感じで作ったりしていく
いきなりまっさらから作るのは無理な話。
テーマをダウンロードする
ダウンロード先のディレクトリを用意して、アクセスする。
cd D:\works\shopify\theme-dawn\前項のテーマをDLする場合はこうなる。
theme get --list --password=1234567890 --store="example.myshopify.com" --themeid=146152718649テーマIDはコマンドから取得する他、管理画面のテーマカスタマイズURLから確認することもできる。
https://admin.shopify.com/store/***/themes/146152718649/editorサンプルとして稼働するテーマをローカルで確認できるようにしておくのが良いですね。
テーマを新規作成する
テーマ用のディレクトリを用意して、アクセスする。
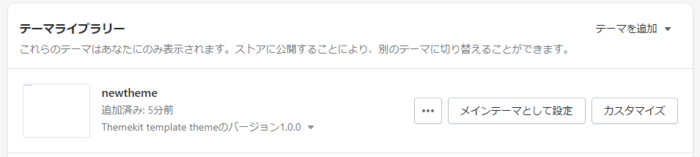
cd D:\works\shopify\theme-original\テーマに好きな名称をつけて作成。このコマンドでローカルとストア両方に処理が成される。
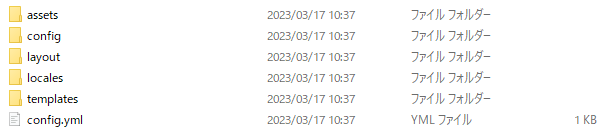
theme new --list --password=1234567890 --store="example.myshopify.com" --name=newthemeローカルでは最低限の構成が生成される。
ストアには同内容でテーマが新規作成される。
場はできたのでやっていこうね、ということになる。
テーマの更新
該当テーマのディレクトリを開いた状態でこのコマンドを打てば、ローカルで編集した内容は自動でアップロード(push)されるようになる。
theme watch都度手動でアップロードする手間から開放される。
Pushを終了したいときは「Ctrl + c」。
まとめ
無知には導入だけでもしんどいので今回はここまで。
記事にしながら時間を掛けて進めたので理解がちゃんと追いついたけど、やることが多い・準備が多いのでやっぱりど素人が手を出すのはしんどいなーって思いました。
地味に多方で使われてるshopify、とりあえず使ってるけどサイトの完成度的にうんこだったりするところは多いので、時期的には後発だけどまだまだ戦える分野だと思います。


コメント